Purpose
Setup OWSM to perform signature validation
Prerequisites
- JKS store should be setup and ready to use. Refer to http://tech-sash.blogspot.com/2009/06/keystore-setup-for-owsm.html for more details.
- OWSM gateway is already created. To create refer http://download-uk.oracle.com/docs/cd/B31017_01/integrate.1013/b31007/gateways.htm
Steps
Step 1: Getting the wsdl URL for the service to be secured.
- Login to the BPEL console.
- Select the process to be secured and copy the wsdl url.
- Move to the WSDL tab.

- Remove the version from the wsdl location. http://server:port/orabpel/domain/BPELProcess1/1.1/BPELProcess1?wsdl to http://server:port/orabpel/domain/BPELProcess1/BPELProcess1?wsdl and copy the new wsdl url. This will ensure the OWSM is always pointing to the latest version of process deployed.
- Remove the version from the endpoint location. http://server:port/orabpel/domain/BPELProcess1/1.1 to http://server:port/orabpel/domain/BPELProcess1 and copy the new endpoint location. This will ensure the OWSM is always pointing to the latest version of process deployed.

To secure a java web service (or any other web service), get the correct web service wsdl URL.
Step 2: Register the web service in
OWSM.
- Login to OWSM.
- Go to PolicyManager --> Register Services. Click on Services.

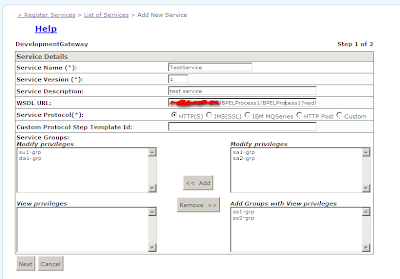
- Click add new service.

- Insert the required details. Please note enter the correct wsdl URL from step 1.4 without the version and then click next.


5. Click Finish and then commit.
6. Go back to RegisterSerices --> List Of Services, find the service created and click on edit.

Note the Service URL and the Service Endpoint URL. These will be provided to the client and also used for testing.
7. Click on Modify Policy
8. In the Request pipeline, click on 'Add Step Below' in the Log step and click OK.
 9. Click on configure in the VerifySignature step. Fill in the appropriate values. Use serverpass for the value while creating the keystore and the alias as the value while importing the client certificate.
 10. Click OK and the commit the changes. The update to the signature are done.
No comments:
Post a Comment